A good number of Biltwell customers are self-made shop junkies and garage-based home builders who believe (like we do) that customizing and maintaining motorcycles is just as fun as riding them. Coming from desert-racing and MX backgrounds, Bill and I thought everyone grew up with as much grease under their nails as we did. Turns out motorcycle maintenance and customizing is a darker art than we speculated. While everyone might dream of building the ultimate motorcycle, most people—us included—wisely leave the hard stuff to professionals. Men (and women) who work on motorcycles for a living have the tools and experience it takes to do the job right. That being said, few experiences are more personally satisfying than installing a new taillight, changing your handlebars or fabricating a sissy bar. Clearly, the DIY in Biltwell’s DNA is strong—it’s why we make bolt-on parts and custom accessories for such a wide range of motorcycles. In the months to come I’ll share some tips for installing these parts and accessories in a blog series called DIY 101.
DIY 101 won’t be a paint-by-numbers portrait for tackling every tough job on your motorcycle—if you’re looking for a tutorial on installing a big-bore kit on your ‘09 Sportster, please Google elsewhere! Instead, I’ll focus on sharing things we’ve learned installing Biltwell parts and accessories on our bikes, plus some tricks the pros have shown us over the years. By doing so I hope readers and customers will gain the courage and insight they need to make tackling bolt-on basics more trouble-free and enjoyable.
This month’s DIY 101 explains how to install our
Gordo risers. We’re kicking off with something easy because believe it or not, we get lots of emails from earnest home mechanics who’ve never swapped bars or risers—enough to make us think bar swaps and seat bolt-ons might be #1 and #2 on every home customizer’s hit list. Whatever the case, we have to start somewhere, and since risers and handlebars were among the very first Biltwell parts we introduced a dozen years ago, we’re starting here.

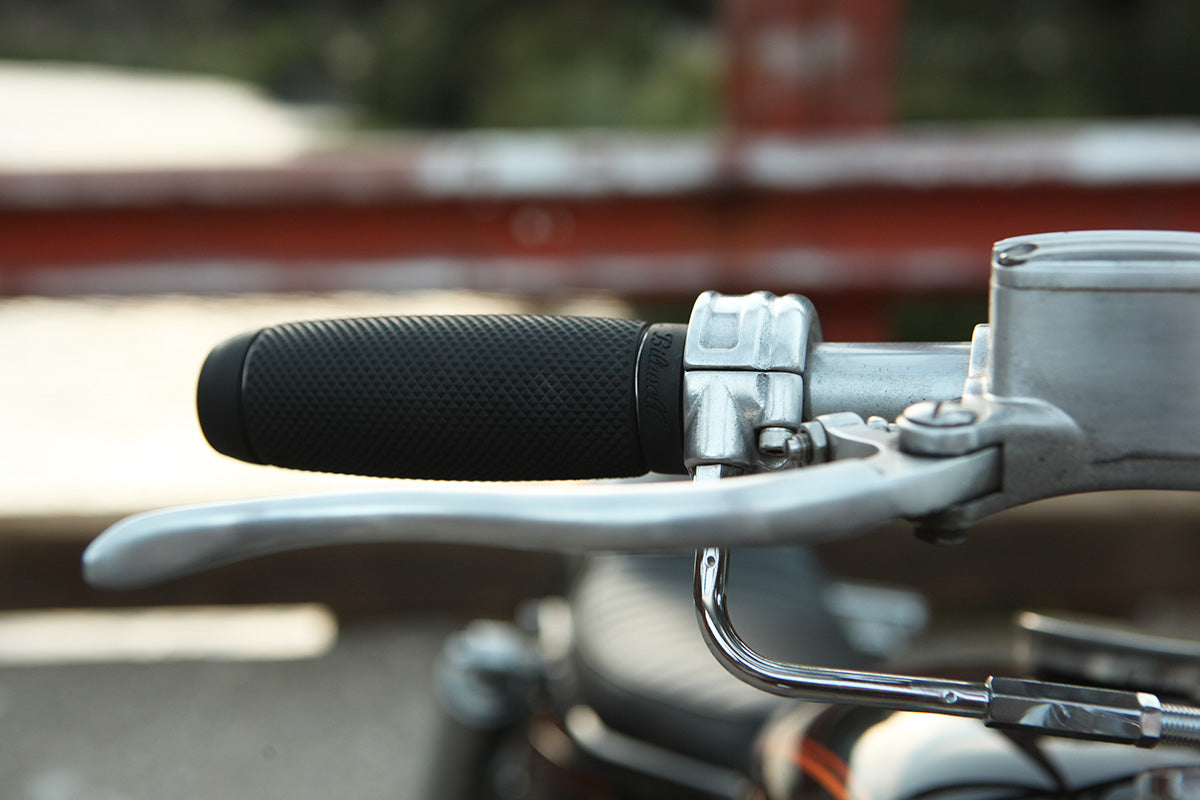
We introduced Gordo risers a couple years ago to extend our riser range into new territory: specifically, H-D Big Twins with fat 49mm forks, and select stock H-D and many aftermarket springers. Unlike Biltwell Slimline risers that came before them, Gordo risers boast thru-bolt—not female threaded—base mounting. This feature lets you use a 1/2-13 t.p.i. Allen cap screw inside each riser to secure it to the mounting holes on springer forks, or in the mounting holes on top triple trees. Gordo risers are available in three rises—2-, 4-, and 6-inch—and two finishes: chrome or matte black electroplate. Gordo risers fit 1-inch O.D. handlebars only, which makes them perfect for upgrading late-model Dynas.
STEP 1: Remove your handlebar/riser assembly from the top tree. If you’re also replacing handlebars, remove both grips and all hand controls. If the thought of wiring, grips and cables make you queasy, enlist the help of a friend with experience. Once your old risers are in the scrap tub, clean and inspect the spacers, rubber isolator bushings, washers, etc. to ensure these parts are compatible with your new Gordo risers. If the base O.D. of your Gordo riser is significantly bigger than the washers and rubber isolators, for instance, you’ll need to rethink this part of your assembly. There are plenty of good aftermarket bushing and alloy bushing replacement kits available, and if your cockpit features tall handlebars, we suggest using them. Solid bushings eliminate the flex that plagues soft or worn out riser bushing. If the riser/handlebar assembly you’re considering is taller than the unit it replaces, make sure your cables and/or hand control wiring is long enough to function properly with your new set-up.
STEP 2: Re-install the rubber isolators and associated washers and spacers (if applicable) into the riser mounting holes on the top tree. Slide one 1/2-13 riser mounting bolt into the hole in the base of Gordo riser, then insert the riser/bolt assembly into its corresponding location on the top tree. Repeat this step for the opposite riser (see illustration A.)
 STEP 3:
 Put a drop of blue Loc-Tite on the threads of both riser bolts and install one washer and locknut on each bolt. Hold the Allen cap bolt inside the riser base with a wrench and torque the nut on the bottom of the riser to 25-35 ft. lb. (34-47 Nm.) Repeat this step for the other riser, making sure to keep both risers aligned parallel to facilitate installation of the handlebar in step 4 (see illustration B.) If you are installing Gordo risers on a springer fork, the 1/2-13 t.p.i. Allen cap bolts supplied may not match the thread pitch on the fork. If this is the case, use riser mounting bolts that thread into the legs of the fork. NOTE: for most springer fork assemblies, nuts and washers supplied with Gordo’s mounting bolts are not required.
 STEP 4:
 Carefully center the handlebar in the Gordo risers and install both top riser clamps. Put a drop of blue Loc-Tite on the threads of each 1/4-20 t.p.i. riser Allen cap screw and thread them into holes on the top clamp (see illustration C.) Sit on the bike to make sure your bars are properly aligned side to side, and that they are in a safe, comfortable upright location. When you are satisfied with the position of your bars, tighten all four cap screws in an X-pattern to 12-15 ft. lb. of torque (16-20 Nm.) NOTE: make sure the gaps between the top and bottom handlebar clamps are even. If the clamps are pinched together, loosen the bolts on one side and tighten the bolts on the opposite side to balance the gap between the clamps. Reinstall your hand controls and a fresh pair of grips according to the instructions from their respective manufacturers. If you’re upgrading to a pair of Biltwell grips with our Whiskey throttle or alloy throttle tube for stock H-D hand controls, tune into this blog for instructions on these parts soon.
 Shakedown and Troubleshooting:
 After triple-checking the tightness and torque of all mounting hardware on risers, bar clamps, cockpit components, etc., fire up your machine in neutral and turn the bars side to side at idle. If turning the handlebars in either direction makes the engine accelerate, your throttle cables are routed poorly. Double-check all cable and brake lines to make sure they flow freely from the hand controls to their associated components. Once your cockpit is buttoned down, go on a short shakedown ride. Adjust your hand controls and bar alignment accordingly, and re-torque all hardware.
Next on DIY 101: Installing Biltwell Whiskey Throttle tube and grips on a stock Harley-Davidson.
 Odds & Ends
 Parts & Labor Expo
 Biltwell 100
 People's Champ
 Born-Free
 Auction
 NorthWest Motofest
 Gypsy Run
 Kernville Kampout
 WTF Blog
 P&L Magazine
 P&L Podcast