This month’s DIY 101 comes in two parts: installing our Whiskey throttle, and installing grips. Our Whiskey Throttle is compatible with a wide range of different model year Harley-Davidson and select aftermarket cables, but as with all custom motorcycle parts, trouble-free installation and retrofitment is never guaranteed—too many quirks, variables and inconsistencies associated with the garage-built chopper game. If you are not confident in your understanding of how this product works or your ability to install and service it, please consult a motorcycle service professional.
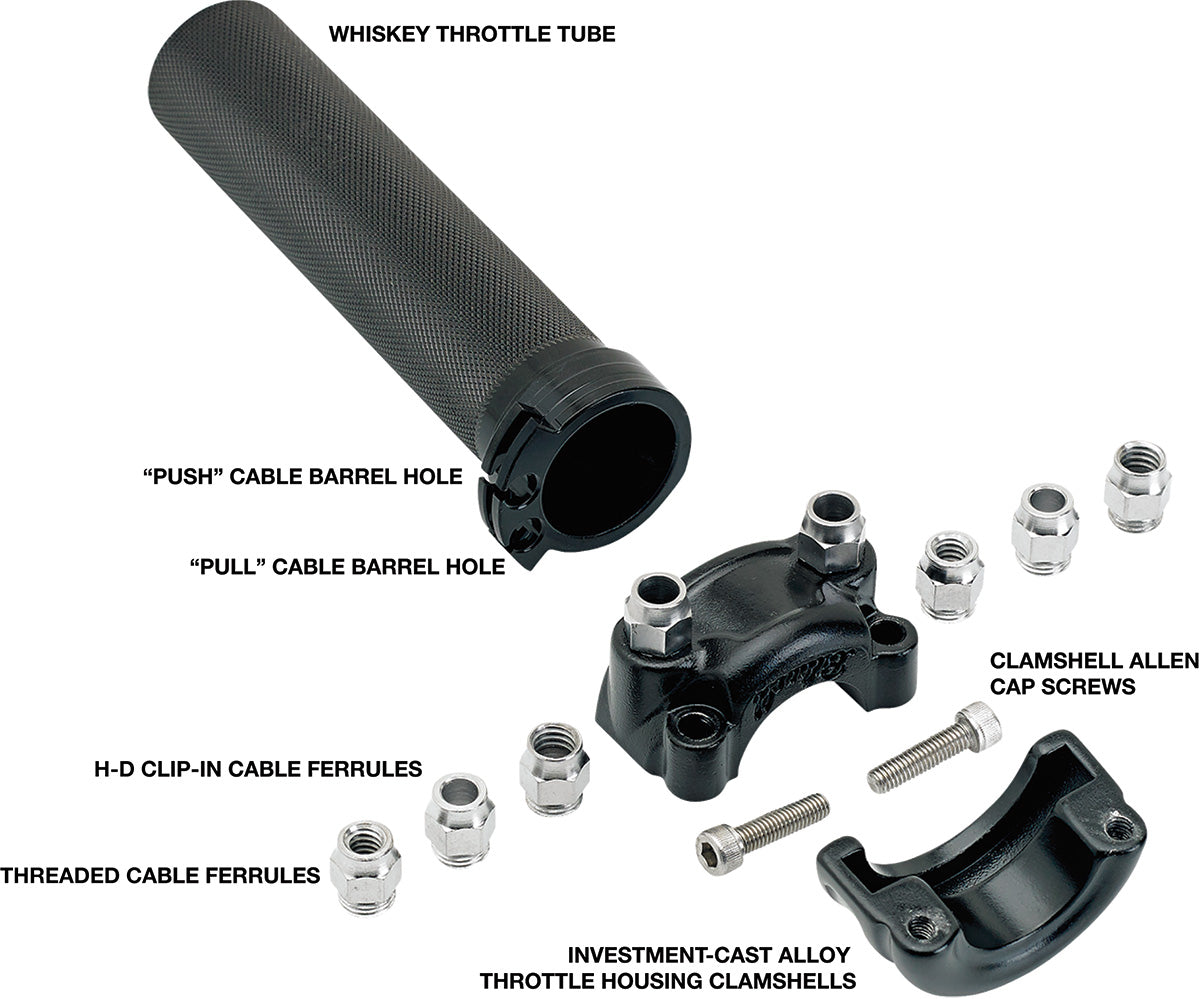
Exploded photo illustration of Whiskey throttle shows names of various parts and components.
Step 1: Remove your H-D throttle assembly and front brake lever if required. Remove cable(s) from the old hand control assembly, being careful not to lose the removable brass ferrules on the cable ends.
 Step 2:
 To gain sufficient cable play for reassembly, we recommend removing the barrel ends on the carb’s throttle mechanism (see illustration A.) This is a good time to inspect, lubricate and/or replace your throttle cable(s).
TECH TIP: The second cable on two-cable throttle assemblies is designed to push the carburetor closed should the main or “pull” cable break or stick during operation. This “push” cable is redundant, and few if any custom motorcycle builders use them. In our experience, the carb’s return spring is much stronger and more reliable for shutting off fuel flow in the event of a cable failure. For this reason, we prefer single-cable throttle assemblies on our personal motorcycles. That being said, these instructions are for
Step 3: Your Biltwell Whiskey throttle assembly includes both internally threaded and smooth bore cable ferrules that screw into the face of the Whiskey throttle clamshell. Using the cable housing on your throttle cable(s) as a guide, select the appropriate cable ferrule(s) for your assembly. If none of the supplied ferrules fit your cable(s) correctly, ferrule modification and/or replacing cable(s) may be required. Don’t skimp with throttle cables—they are literally the life line between you and your motorcycle. Badly worn, poorly customized and/or incorrect throttle cables can cause serious injury or death. Do it right.
Step 4: Put a drop of blue Loc-Tite on the external threads of the ferrule you selected for the “pull” cable of your throttle assembly and gently tighten it into the appropriate hole on the Whiskey throttle clamshell. Insert the ball end of the “pull” cable through this ferrule and install it into the appropriate slot on the alloy throttle tube with its brass fitting as shown (see Illustration B.) If you are installing a 2-cable Whiskey throttle, repeat this step for the “push” cable.
 Step 5:
 Thoroughly clean the right-side end of your handlebar with contact cleaner and a clean rag. Apply a thin coating of light assembly lube (aerosol Tri-Flow works great) to four inches of the bar end and slide the alloy throttle tube/cable assembly onto the handlebar.
Step 6: Fit the remaining half of the Whiskey throttle clamshell onto the back side of the alloy throttle tube. Apply a light coating of assembly lube to the threads of both Allen cap screws and loosely thread both bolts into the clamshell. DO NOT TIGHTEN (see Illustration C.)
 Step 7:
 Pull the loose end of the throttle cable(s) at the carb side, making sure the cable housing(s) and associated adjusters and hardware are properly seated in the ferrules of the clamshell assembly. Reinstall the barrel end(s) into the spring-loaded mechanism on the carburetor.
Step 8: Check grip tube endplay on your Whiskey throttle assembly by wiggling the grip side to side along the plane of the handlebar. There should be approximately 1/8-inch of endplay between the grip tube and the clamshell assembly. If tightened and/or adjusted incorrectly, the grip tube will bind against the clamshell and/or the handlebar end, compromising throttle performance. Once correct endplay is achieved, gently tighten the throttle clamshell onto the handlebar. Do so by turning each screw 1-2 turns, then alternating to the opposite screw. Do this until the clamshell is securely tightened around the handlebar. DO NOT OVERTIGHTEN.
Step 9: Check throttle cable tension at the housing adjuster(s) and clamshell ferrules, fine-tuning your assembly according to the specs for the fuel system on your motorcycle. Follow this checklist BEFORE starting your motorcycle:
- Do your cable(s) flow smoothly from handlebar to carb without kinks, bends or tight spots?
- Does the carburetor snap closed when you turn and release the throttle grip?
- Is every nut, bolt, adjuster and related hardware on your throttle assembly installed and tightened correctly?

Now that your Whiskey throttle is dialed in, it’s time to install some fresh grips. Simple though the process might appear, the large number of emails we receive from customers asking us how to install grips makes us think some DIY 101 tips are in order.
Biltwell grips are different from stock Harley-Davidson and most aftermarket grips in that they do not feature an integrated plastic throttle tube on the right-side grip. This feature alone makes our grips much more like grips for dirt bikes and sport bikes.
Installing Biltwell grips on stock and select aftermarket H-D hand controls requires using our Whiskey throttle tube, sold separately. This CNC-machined 6061 T-6 aluminum component is similar to the aftermarket throttle tubes commonly found on dirt bikes. Pro Circuit, Renthal and other high-end MX companies pioneered this upgrade decades ago. We cut our two-wheeled teeth in the dirt, so we know the advantages of this setup—aluminum throttle tubes with rubber grips offer more durability, precision and comfort than plastic throttle tubes and fat, hard grips all day long.
 Installing Biltwell grips
Step 1:
Installing Biltwell grips
Step 1: Remove the old grips from the throttle tube and handlebar. Depending on their age and condition, it may be necessary to cut off the grips with a razor blade. If chunks of old grip remain on the bar or throttle tube, use contact cleaner and a ScotchBrite pad to clean these surfaces thoroughly before installing new grips.
Step 2: Identify which grip fits on the clutch side (left bar end), and which fits the throttle tube. The grip with the smaller hole on the flange end fits the clutch side; the larger inside diameter hole fits the throttle tube. This is true for both 7/8- and 1-inch size grips. FYI, the numerical measurement for grips refers to the outside diameter (O.D.) of the handlebar for which it is designed to fit.
Step 3: Spray a 2- or 3-second blast of aerosol WD-40 into the open end of the clutch side grip, then pour out the excess fluid into a paper towel. Using a gentle pushing and twisting motion, slide the grip onto the handlebar until the end of the bar pushes firmly against the inside end of the grip. Repeat this process for the other grip on the throttle side. DO NOT use aerosol hair spray, spray glue, petroleum products or other chemicals to install Biltwell grips. WD-40 works great because it makes sliding the grip onto the handlebar easy, then bonds the rubber material to the handlebar after drying.
Step 4: Wipe any WD-40 residue of the flanges and grip ends with a lint-free disposable towel. Let the grips dry overnight before riding your motorcycle. If you plan to safety wire your grips for added security, do this after the grips have had a chance to dry.
[embedyt] http://www.youtube.com/watch?v=kByD0WHIrGU[/embedyt]

[embedyt] http://www.youtube.com/watch?v=MGf8zHfYv34[/embedyt]
 Odds & Ends
 Parts & Labor Expo
 Biltwell 100
 People's Champ
 Born-Free
 NorthWest Motofest
 Gypsy Run
 Kernville Kampout
 WTF Blog
 P&L Magazine
 P&L Podcast