Odds & Ends
 Parts & Labor Expo
 Biltwell 100
 People's Champ
 Born-Free
 Auction
 NorthWest Motofest
 Gypsy Run
 Kernville Kampout
 WTF Blog
 P&L Magazine
 P&L Podcast
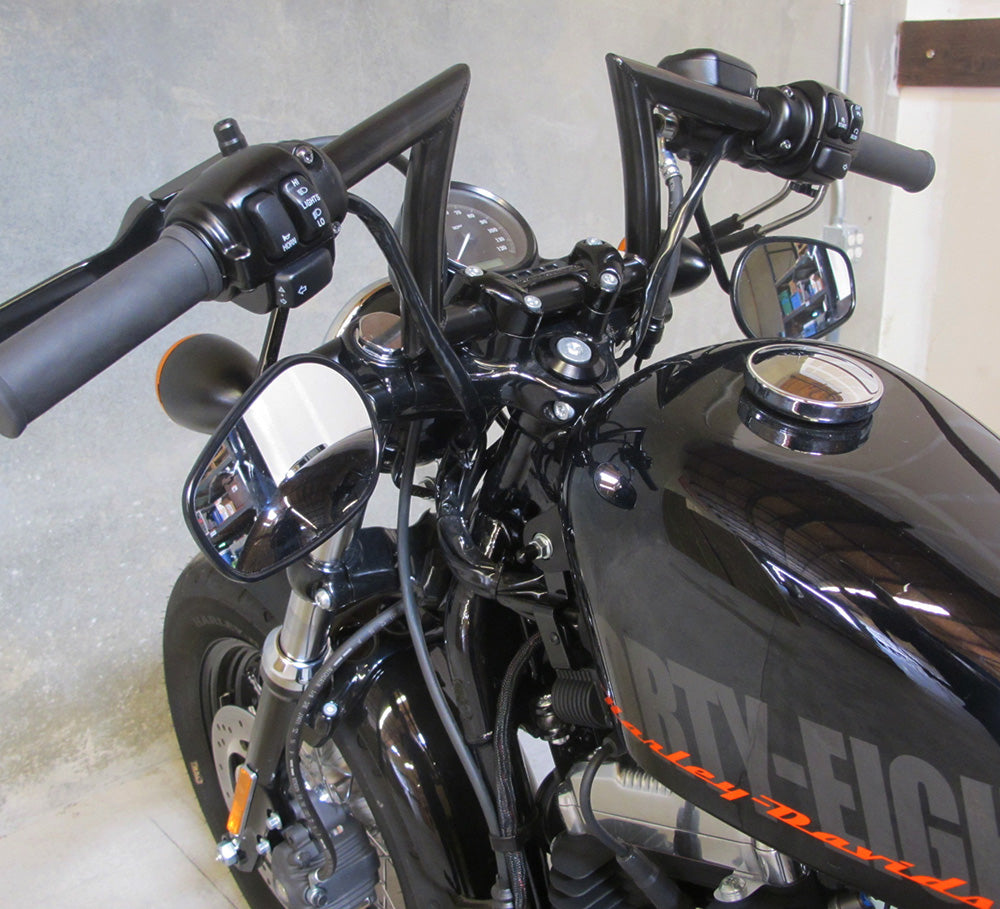
Installing handlebars. What could be easier, right? Wrong.When we introduced it a dozen years ago, our Keystone handlebar quickly rocketed to the top of the Biltwell charts. Five years later you couldn’t swing a dead cat at a SoCal roadhouse without hitting a Sportster with a set of our top-seller, and for good reason—the look is tough, the swap is trouble-free and the ergonomics are spot-on. We’re illustrating this how-to with the Keystone/H-D XL combo because it shows several of the stumbling blocks home customizers will encounter during the bar swap process, including cable length, mirror location, bar dimples, etc. Your bike and bar choice might be different, but the tips and tricks are the same.
 Before picking up a wrench, sit on your bike and hold your new handlebar behind the current bar assembly. Look at the lever(s), cables, wires and stock hand controls, if applicable. Do these parts look like they will mount properly to the new handlebar, or is the new bar too tall and/or too wide for a simple swap? If the latter is the case, you may have to install new clutch and/or throttle cable(s), longer hand control wiring, etc. For the sake of this how-to, let’s assume your new bars are a direct swap with all current hand controls and associated components—no longer cables or wiring required.
  Step 1: Cover your gas tank with an old t-shirt to avoid scratching the paint or denting the tank when you drop a tool. Trust is—it WILL happen. Loosen and remove the Torx bolts that secure the levers and control pods on your handlebars. Carefully dangle these assemblies to the side of your motorcycle, making sure they don’t bang against anything on their way to their final resting place. Store the perch clamps and hardware in a safe place. If you hate Torx heads bolts as much as we do, now is a good time to switch the old hardware with comparable Allen cap replacements.
Stumbling blocks you might encounter during a bar swap include cable and wiring lengths, mirror location, bar dimples, etc.
Step 2: Loosen and remove the Allen cap screws that hold the handlebar and top clamp assembly on the risers. Carefully pull the old handlebars out of the throttle tube that should be hanging on the right bar end with two cables attached, assuming this assembly didn’t self-destruct during step one. If you’re also replacing the handlebar risers, now is the time to remove them from the top tree.
Step 3: We aren’t going to share any secrets for salvaging hand grips on old bars because stretched out, badly worn grips belong in the trash, not in your hand. What we will tell you is this: we offer a wide range of grips for motorcycles, in colors, sizes and styles to suit any occasion. See them all here. (https://www.biltwellinc.com/c11/buy/grips/)
Step 4: Sit on your bike and gently set your new handlebars into the bar clamps on the top tree. IMPORTANT: The slots precisely align with the underside of hand controls on stock Harleys to give the wiring a place to pass beneath the perch on each lever. If you are not using the stock control pods and decide to cut your bars, make sure the inside and outside edges of your cuts are deburred completely so the throttle tube turns smoothly, and so the bar doesn’t cut the end of the hand grip(s).  Step 5: Carefully center the handlebar in the risers and install the riser clamp(s) and speedometer assembly (if applicable.) Put a drop of blue Loc-Tite on the threads of each riser cap screw and screw them into the threaded holes on the handlebar risers. Sit on the bike to make sure your bars are properly aligned fore/aft and side to side, and that they are in a safe, comfortable riding location. When you are satisfied with the position of your new bars, tighten all four cap screws in an X-pattern to 12-15 ft. lb. of torque (16-20 Nm.)
Step 6: Clean both bar ends with contact cleaner, then loosely reassemble the control pods and throttle assembly, making sure each pod’s wire loom flows smoothly outside the pod body and into the corresponding slot on each side of the handlebar. For more tips on reassembling the throttle, click here: (https://www.biltwellinc.com/wtf/2016/09/diy-101-installing-biltwell-whiskey-throttle-grips/) Do not tighten the hand control pods yet.  Step 7: Reinstall the clutch and brake levers on the handlebars, making sure both control pod clamshells engage with the locating slots on the lever perches. Put a light dab of assembly grease on the lever clamp screws before threading them into the perches. Do not tighten the clamps yet.
Step 8: Sit on your motorcycle with your hands on the bars. Check fore/aft positioning of your bar in the risers, the angle of levers on bar ends, and the location of your control pods relative to the locating slots on the lever perches. If everything feels right and is engaged correctly, NOW you can tighten your riser bolts and hand control hardware. When doing so, make sure the clutch and brake lever perches DO NOT pinch the wires that run between them inside the dimples on the bars.
Step 9: Installing grips is the last piece of the new handlebar project, and you can read our tips for this how-to here. (https://www.biltwellinc.com/wtf/2016/09/diy-101-installing-biltwell-whiskey-throttle-grips/) When you install new grips, please give them ample time to dry securely to the bar ends before going on a shakedown ride—we recommend 24 hours. After taking your new bars for a test spin, double-check the tightness of ALL hardware—control pods, lever perches, top trees, riser clamps—to make sure everything is tight. We recommend checking this hardware a third time 150 miles or so after any new part install.
Double-check the tightness of ALL hardware—control pods, lever perches, top trees, riser clamps—to make sure everything is tight.